Last week we visited the HartmanEVENT 2011 in the Netherlands. This is were my boss attended the "Content Tool Idol 2011" contest and informed me about a nice little feature he had seen in one of the vendor sessions. The feature allowed the editor to easily translate texts using Google's translate service.
Because I like challenges and love the flexibility of Kentico CMS, I decided to create my own Google translate implementation. One day later I got the following result:
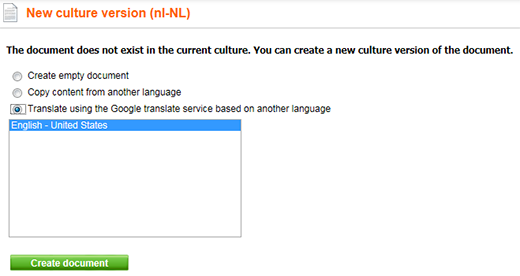
When you have setup a website using multiple cultures you get a third option when creating a new culture version of the document. The option allows you to translate the document using the Google translate service based on a version of the document in another language.
When you hit the "Create document" button, the Google translate service will check all the "String" fields and translates them using the Google API for dotnet. This results in the following:

Pretty nice and simple right? If you would like to integrate this in your own Kentico CMS installation, then the following steps will show you how it's done:
Step 1: Download the Google API for dotnet and it to the Bin folder of your Kentico CMS installation.
Note: I have used the 3.5 .NET Framework version of the API. For other versions please go to the following location.
Step 2: Make adjustments in the following files (line numbers are included).
Note: The code changes and line numbers apply to a clean installation of version 5.5R2.
CMSModules\Content\CMSDesk\New\NewCultureVersion.aspx
line 25:
<tr>
    <td>
        <asp:RadioButton ID="radGoogleTranslate" runat="server" GroupName="NewVersion" EnableViewState="false" />
    </td>
</tr>
line 58:
if (radCopyElem.checked || radGoogleTranslateElem.checked) {
line 71:
else if (radGoogleTranslateElem.checked) {
    document.location.replace("../documentframeset.aspx?action=newculture&nodeid=" + nodeId + "&sourcedocumentid=" + lstCulturesElem.options[lstCulturesElem.selectedIndex].value + "&translate=google");
}
CMSModules\Content\CMSDesk\New\NewCultureVersion.aspx.cs
line 25:
"var radGoogleTranslateElem = document.getElementById('" + radGoogleTranslate.ClientID + "');\n" +
line 36:
radGoogleTranslate.Text = ResHelper.GetString("ContentNewCultureVersion.GoogleTranslate");
line 40:
radGoogleTranslate.Attributes.Add("onclick", "ShowSelection();");
CMSModules\Content\CMSDesk\Edit\Edit.aspx.cs
line 297:
// Check for the translation option
if (QueryHelper.GetString("translate", "").Equals("google"))
{
    // Setup the from and to cultures
    string fromCulture = CultureHelper.GetCultureInfo(node.DocumentCulture).TwoLetterISOLanguageName;
    string toCulture = CultureHelper.GetCultureInfo(formElem.CultureCode).TwoLetterISOLanguageName;

    // Initiate the Google translate client using the current domain
    Google.API.Translate.TranslateClient client = new Google.API.Translate.TranslateClient(UrlHelper.GetCurrentDomain());

    // Get the class of the new document
    CMS.DataEngine.IDataClass treeClass = CMS.DataEngine.DataClassFactory.NewDataClass(node.NodeClassName, node.TreeProvider.Connection);

    // Loop through the column names
    foreach (string col in treeClass.StructureInfo.ColumnNames)
    {
        // Check if the column is of type string
        if (treeClass.StructureInfo.GetColumnType(col).Name == "String")
        {
            // Update the value of the field using Google's translating service
            DataHelper.SetDataRowValue(formElem.BasicForm.DataRow, col, client.Translate(ValidationHelper.GetString(node.GetValue(col), ""), fromCulture, toCulture));
        }
    }
}
Step 3: Add the following (English) localization string using the UI Cultures module:
Key: ContentNewCultureVersion.GoogleTranslate
Text: Translate using the Google translate service based on another language
And you're done! Feel free to tweak the code and happy translating!